YOUR ULTIMATE RESOURCE ON THE NEW
DIGITAL ECONOMY
Topics about Smart Cities, Fintech, Digital Marketing, Internet of Things, Social Media and Everything Else
by Yap Heng Kiong
|
Google Tag Managers are Tracking scripts you set up to place on your website to monitor web performance. Google Tag Manager saves time by letting you place tagging scripts on your own.
The following steps outline the process from setting up a Google Tag Manager (GTM) to installing and configuring to monitor your web performance. Using Google Chrome, goto https://www.google.com/analytics/tag-manager/ Setting Up A Google Tag Manager Account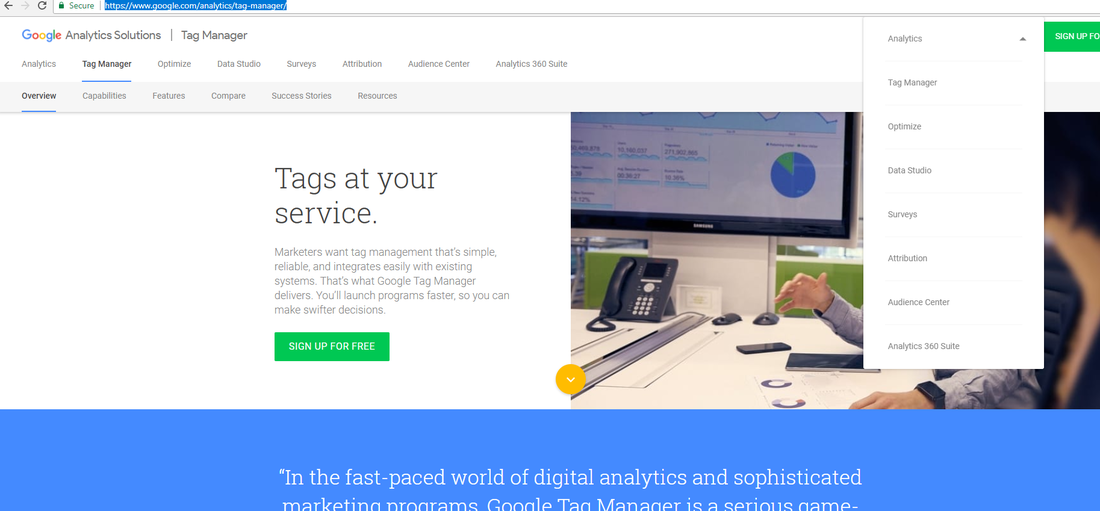
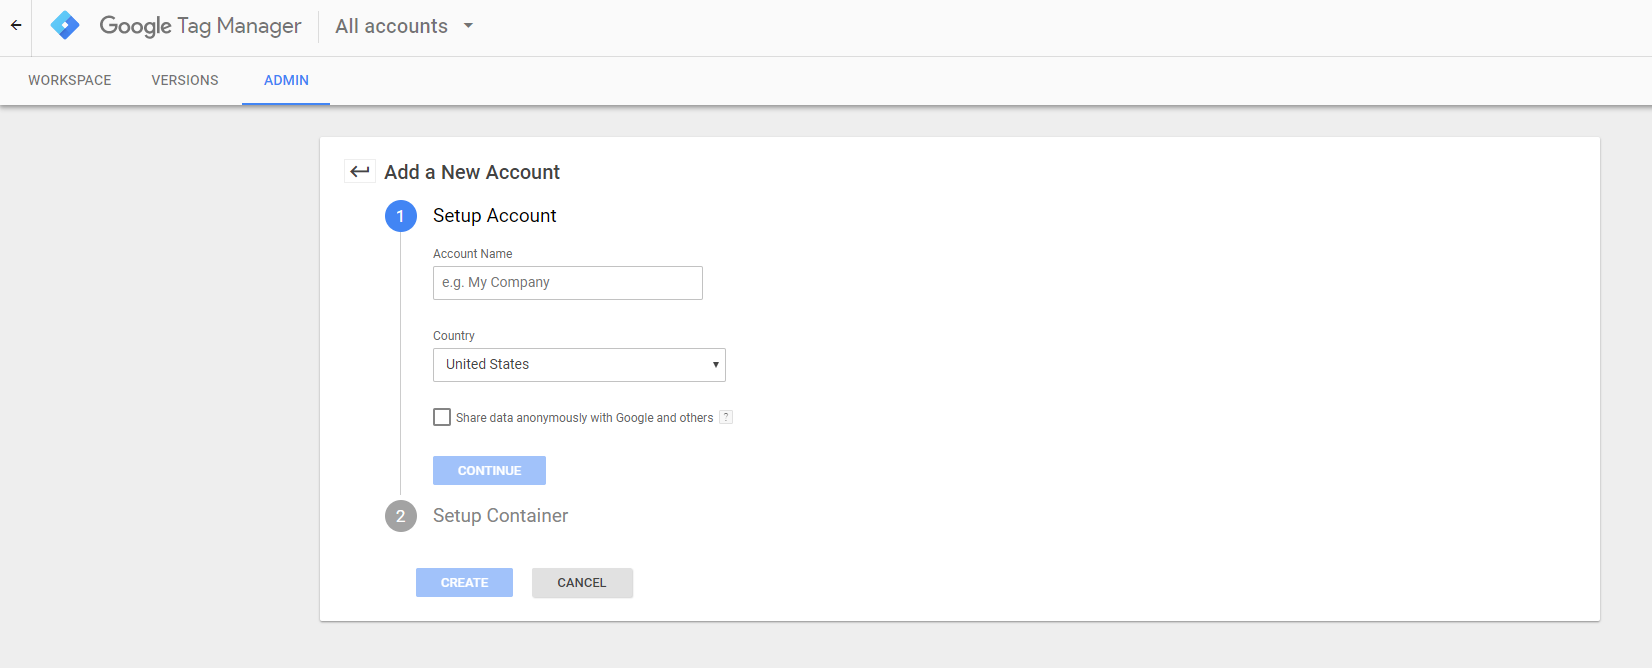
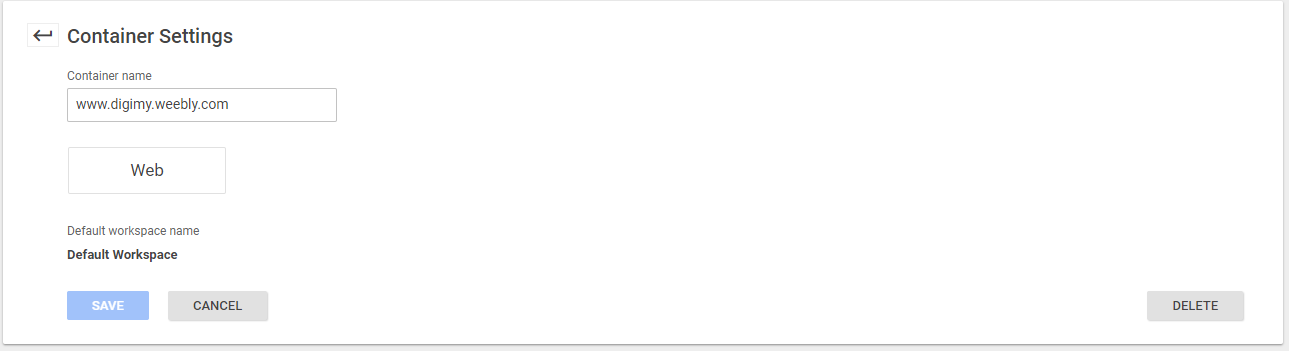
After logging in, add a New Account. This is where you set up your Account information and the types of Containers. Since I want to monitor the web performance for my own website, www.digimy.weebly.com, I set up the Container Settings as shown below.
Next, still at Admin, choose Install Google Tag Manager.
Copy the Tag Manager Codes onto your Website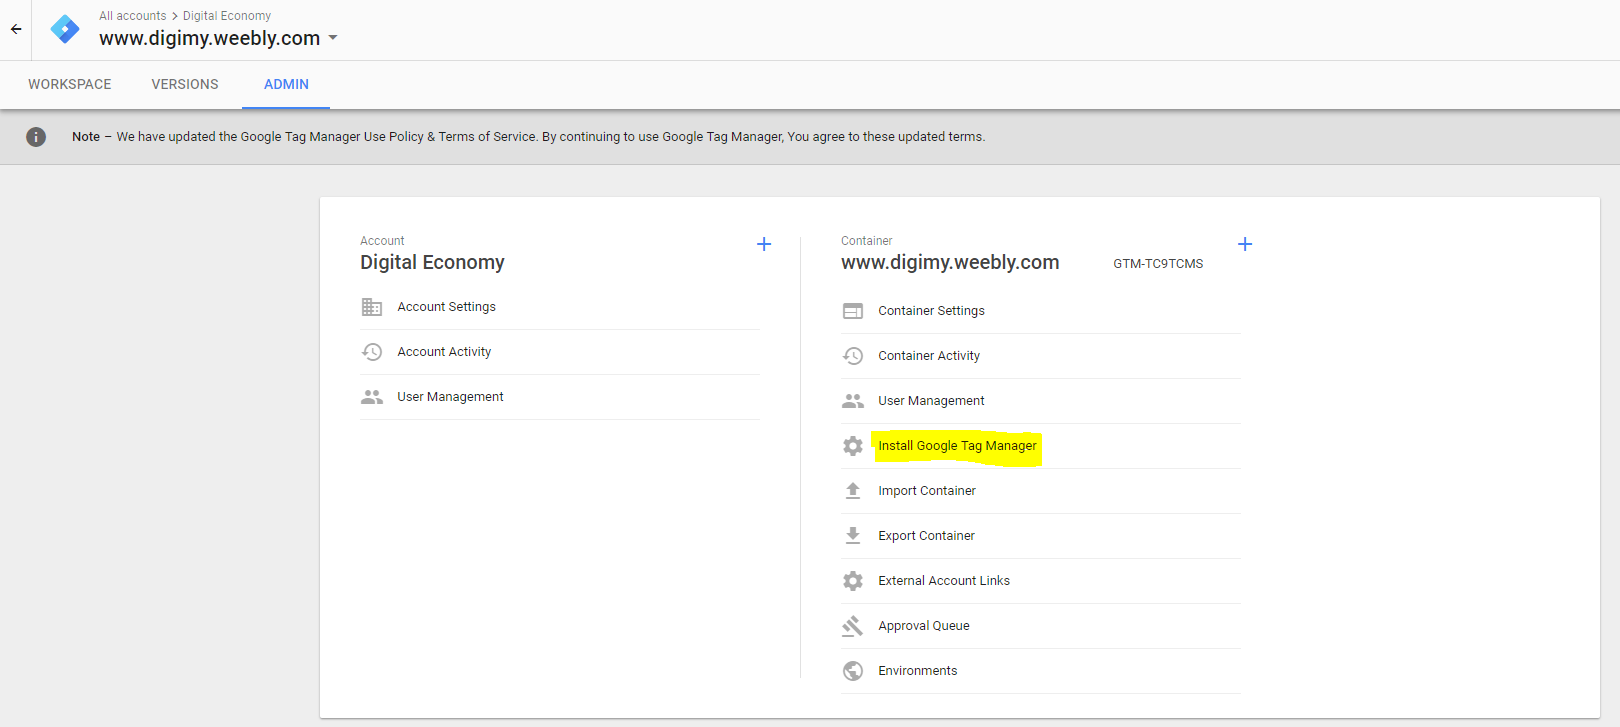
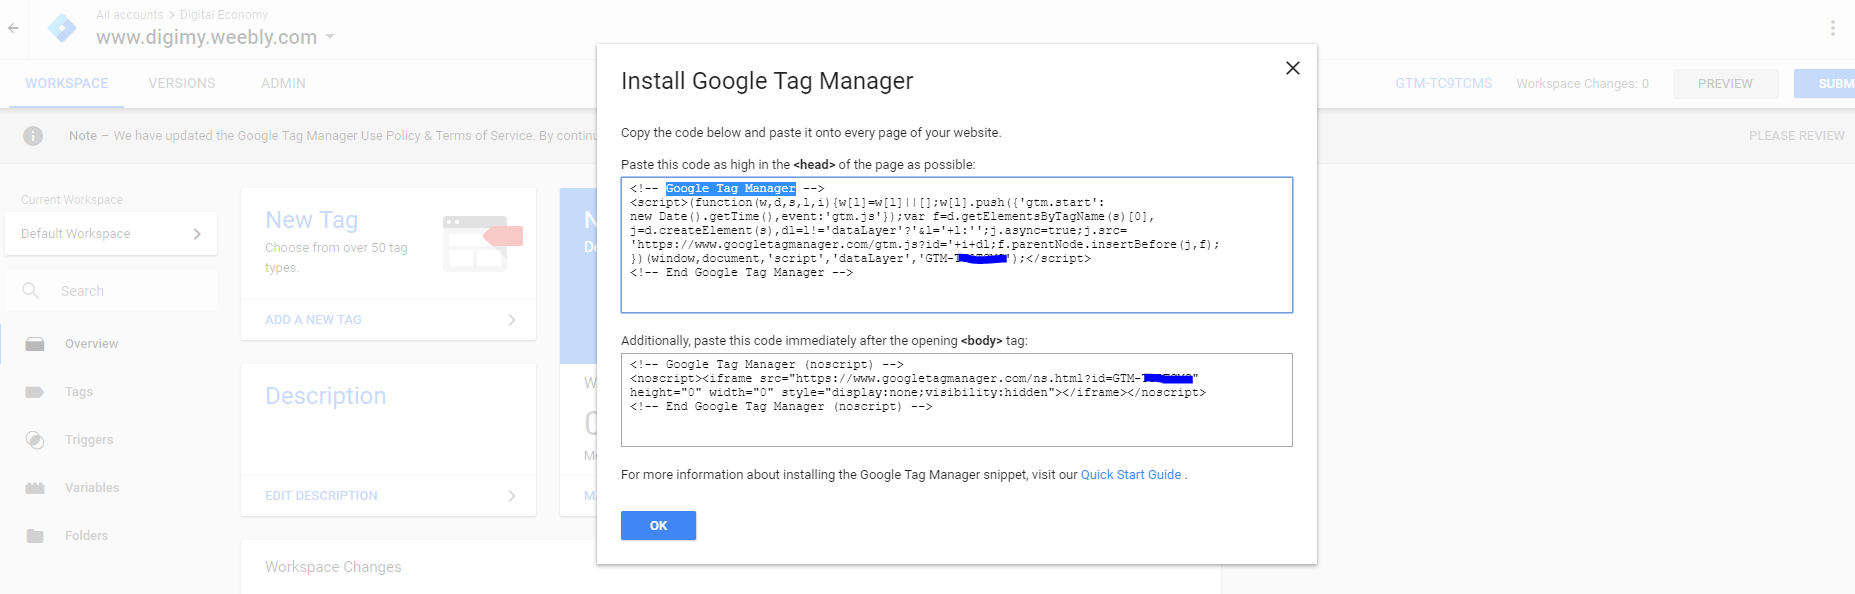
The first block of codes to be pasted as high in the <head> of the page as possible. As I am using Weebly for my blog, these codes will go to Settings > SEO > Header Code 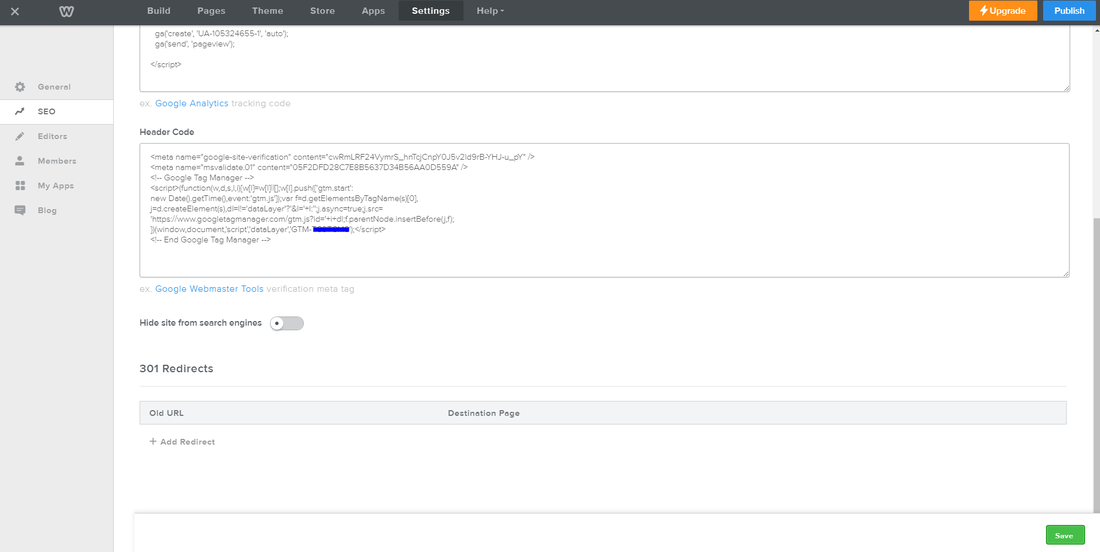
Additionally, the second block of codes should be pasted immediately after the opening <body> tag of each page to be tracked. Hence, using the Embed Code element above all my other content of that page. 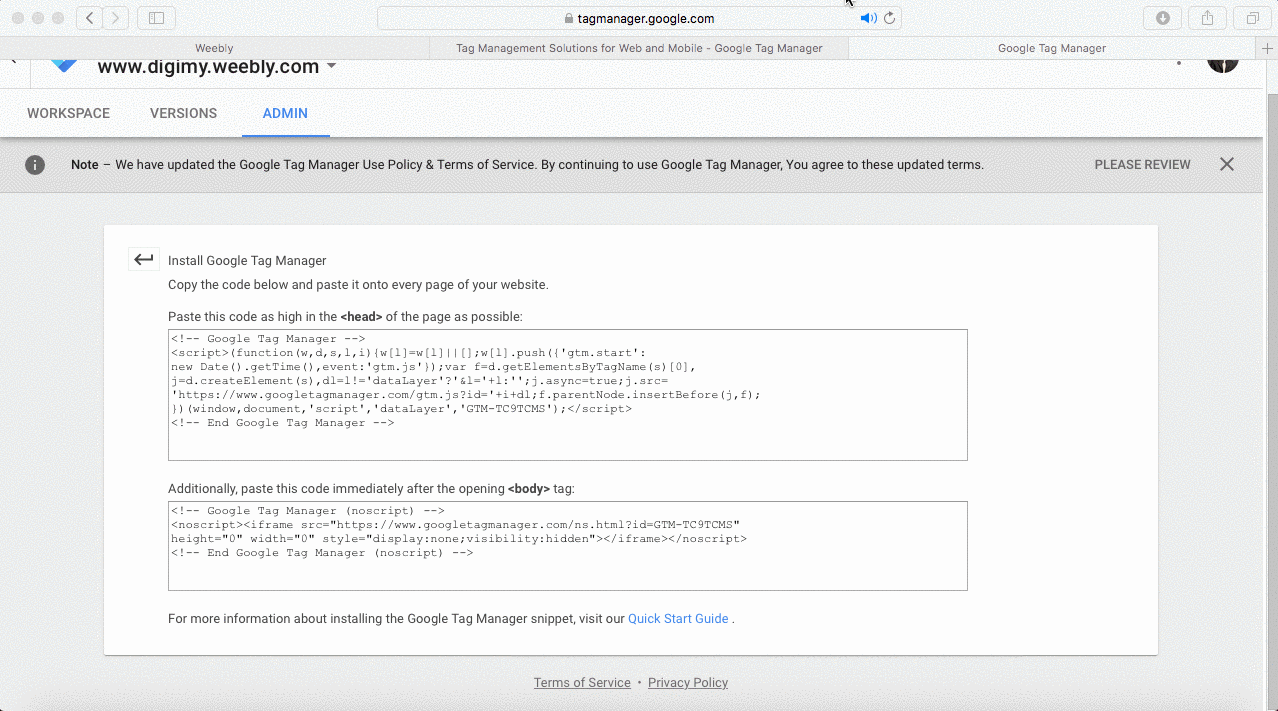
Creating an Universal Analytics Tag with GTM
First and foremost, obtain the Google Tracking ID by signing on to Google Analytics. Goto Admin setting, select the website you wish to track and click on Tracking Code under Property.
Copy down the Tracking ID starting with UA. You will need this later. Storing your Google Analytics Tracking ID with Variables
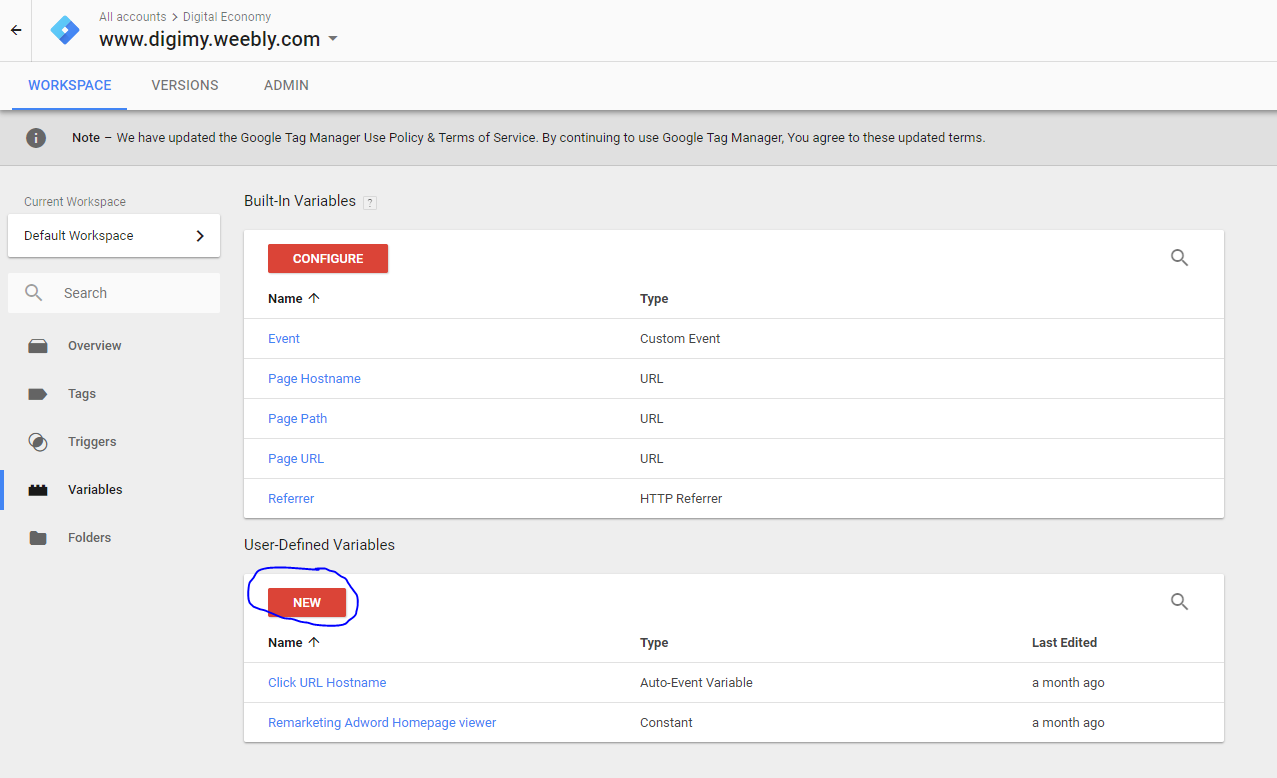
Instead of pasting the Tracking ID over and over again at Google Tag Manager whenever we set up a tag, I want to use the Variables option to store the Tracking ID. Click on Variables at GTM, and choose NEW Use-Defined Variables.
I want to name the new Variable as digimy weebly Google Analytics Tracking ID.
On the right panel, scroll down until you find Constant. 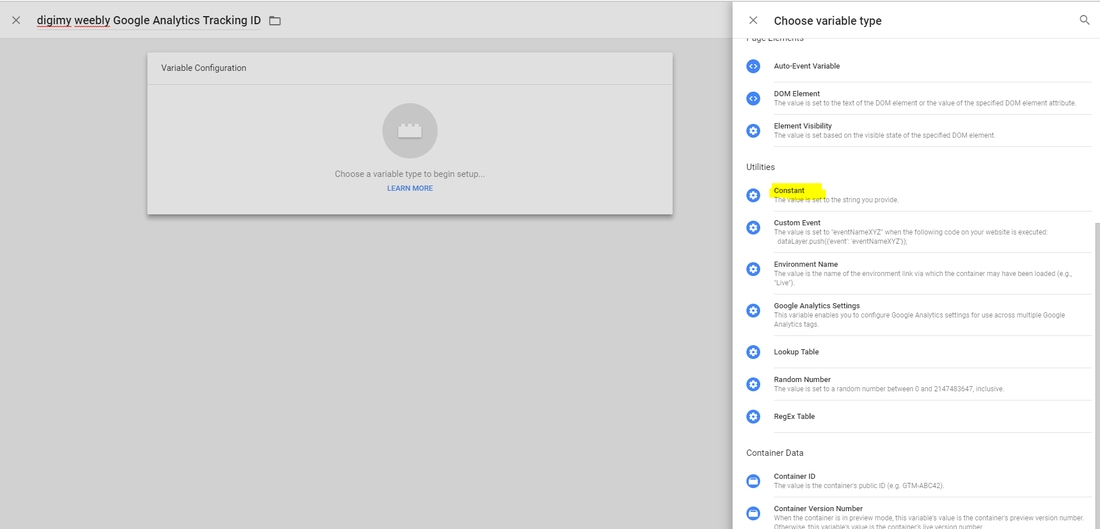
Paste the Google Analytics Tracking ID under the Value box and click on SAVE.
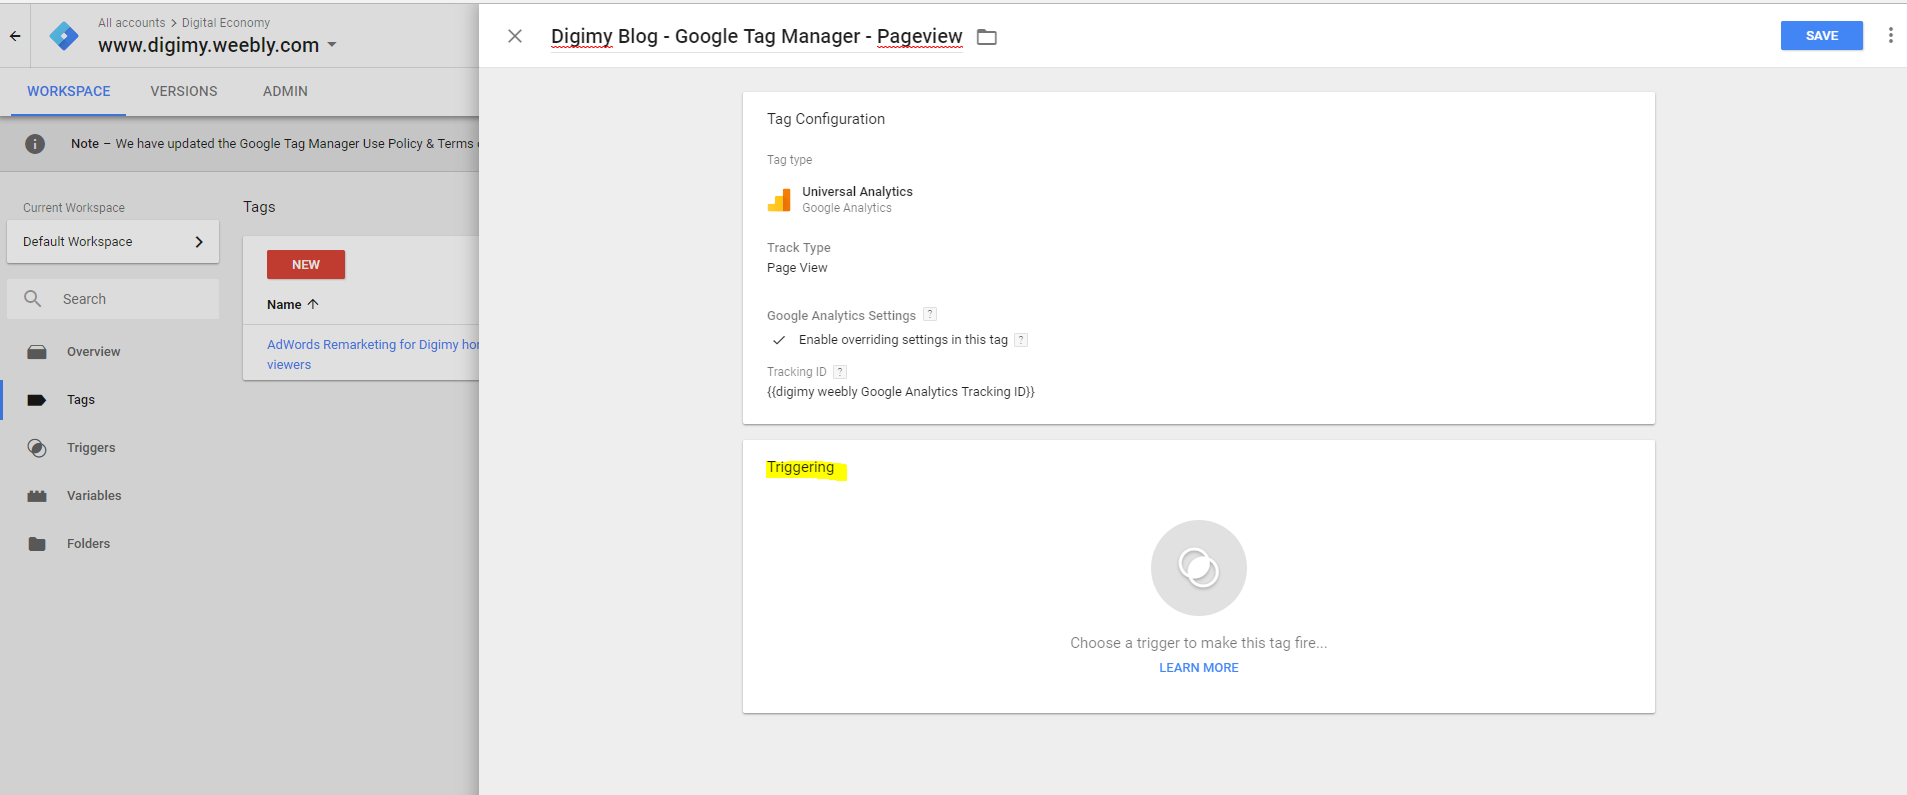
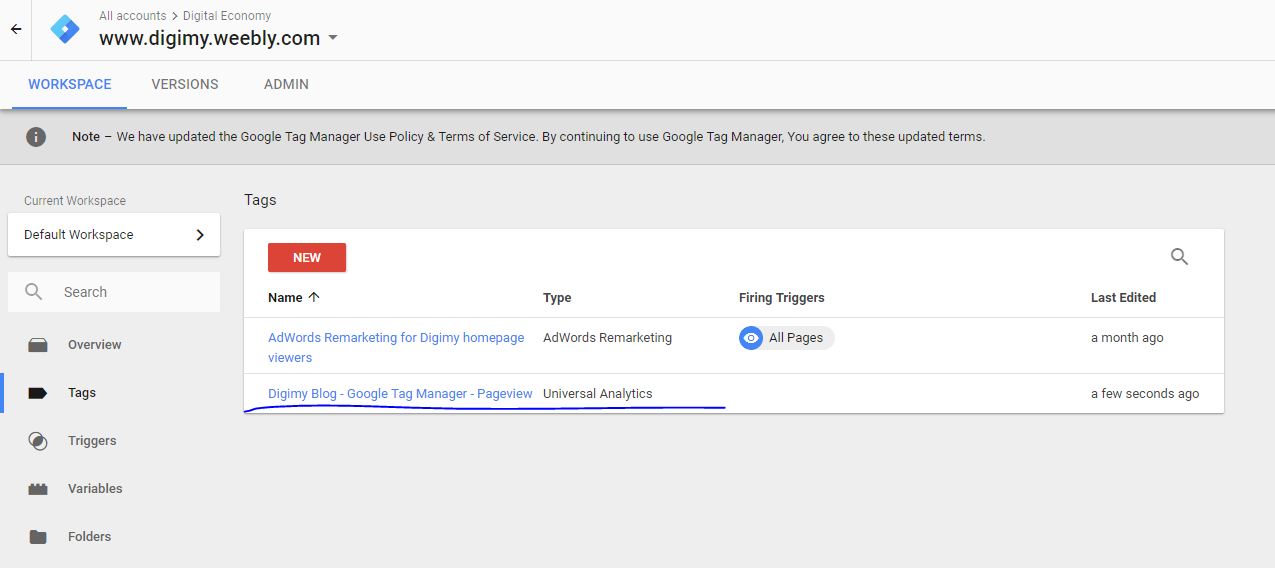
Under Tags, click on NEW as shown below. I want to set up the Tag Manager to monitor pageviews to my Google Tag Manager blog (this blog). Hence, I name it as- Digimy Blog - Google Tag Manager - Pageview 

There various Tracking Types. For our purpose of monitoring this blog, let's choose Page View for now.
Check Enable overriding settings in this tag. Click on the icon next to Tracking ID
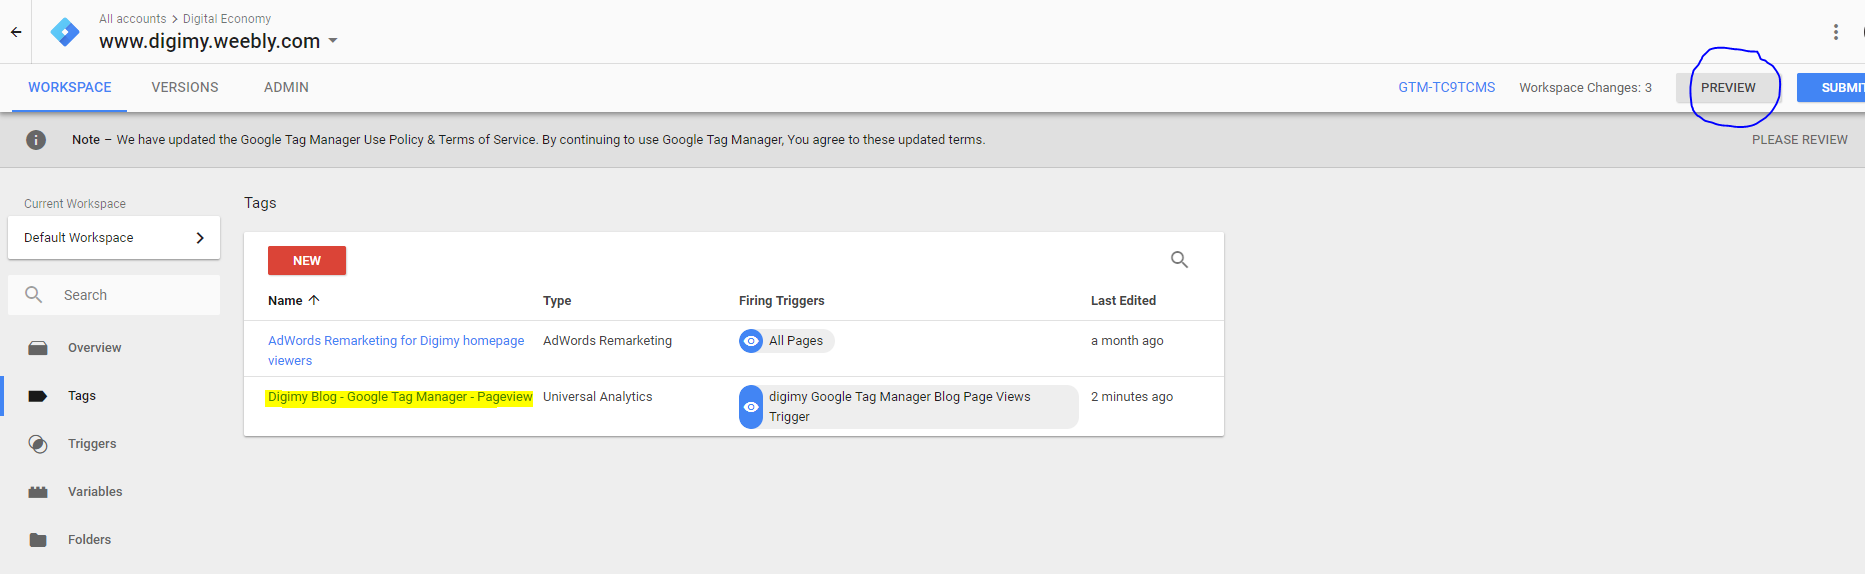
We will now configure when this Tag will trigger as follows-
I want to name the Trigger as digimy Google Tag Manager Blog Page Views Trigger.
Select Page View -> Some Page Views and then enter the page URL as follows. Page URL equals <URL> 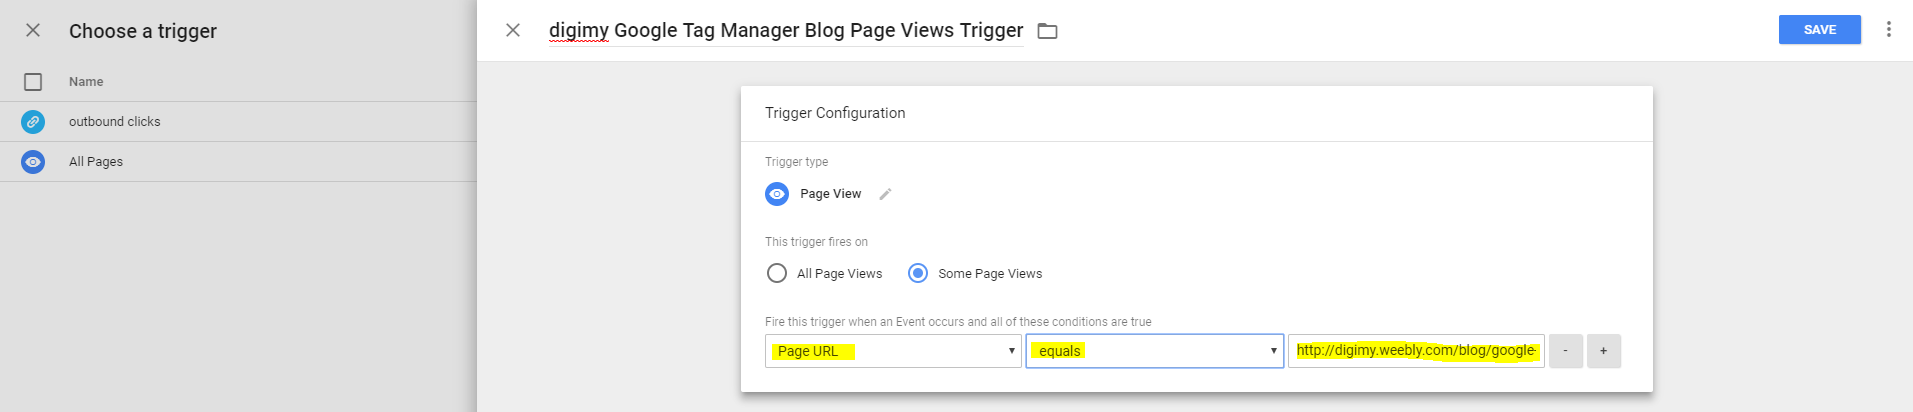
Click SAVE.
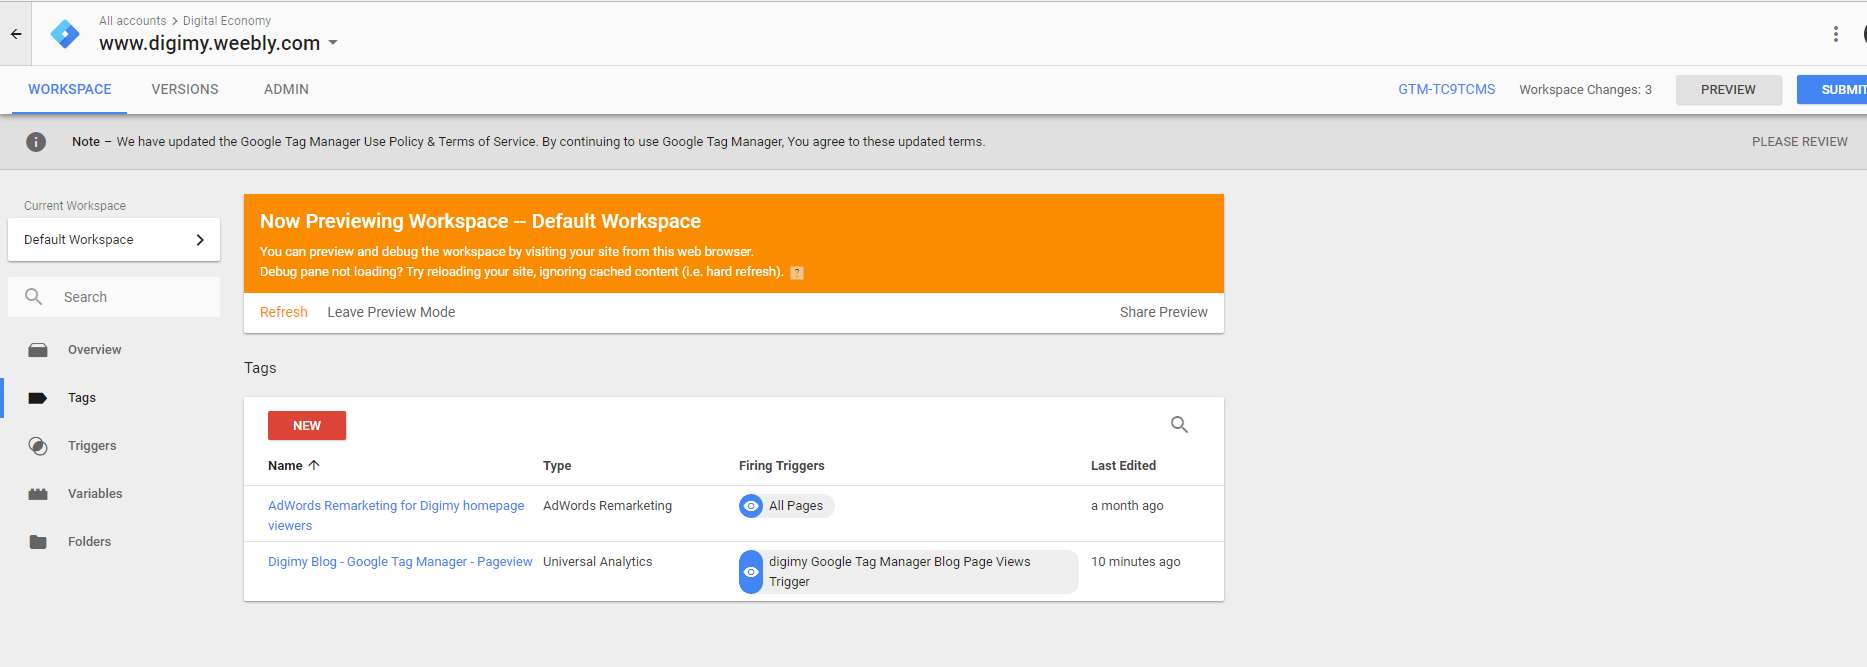
Testing the Tags Triggering in PREVIEW Mode
Let's do a simple test to check if this tag gets triggered. Click on PREVIEW.
Next, open a new Window and goto the web URL that you have configured to monitor. In my case, that would be
http://digimy.weebly.com/blog/google-tag-manager Because we are in Preview Mode, the webpage opens up a preview window at the lower window as shown below- You should see the correct Tags being fired at this page. 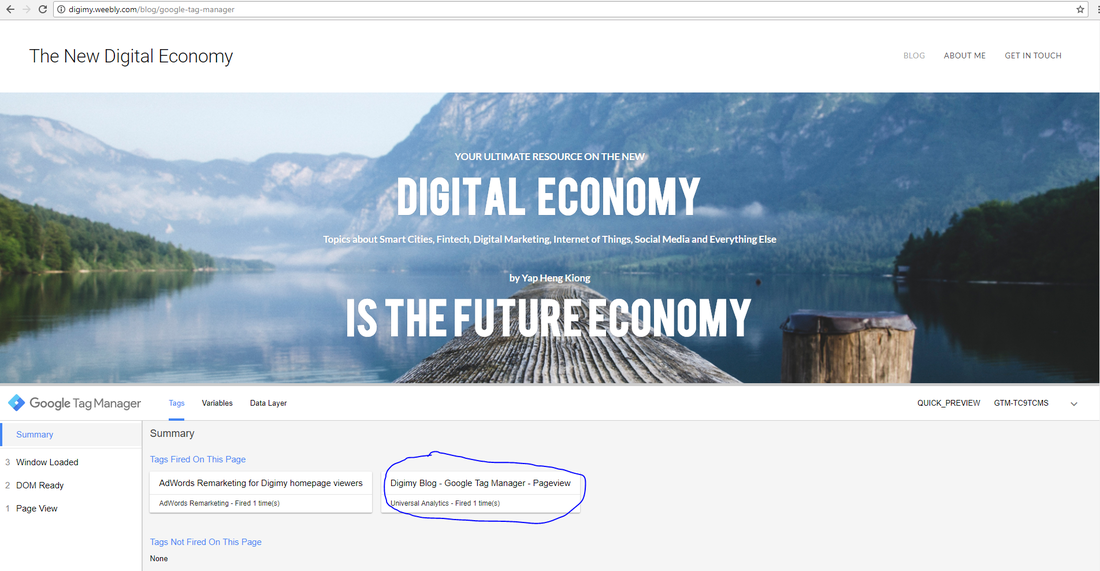
If you head over to Google Analytics dashboard at this time, you should see an active user

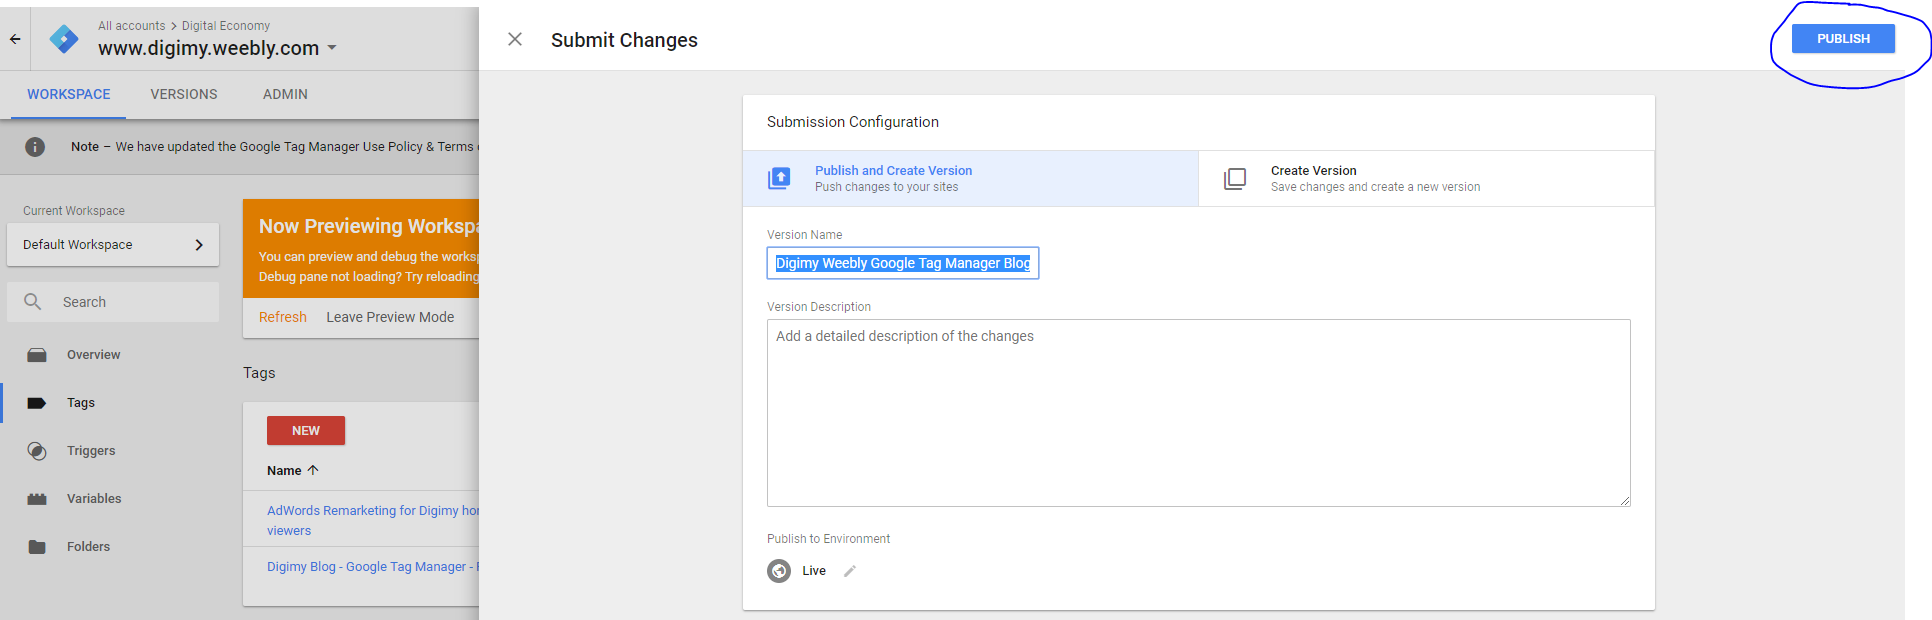
Publishing the Tag
It's time to publish the Tag. Click on SUBMIT.
Enter a name of your choice then click on PUBLISH. In my case, Digimy Weebly Google Tag Manager Blog Page View 
6 Comments
Personalised Emails?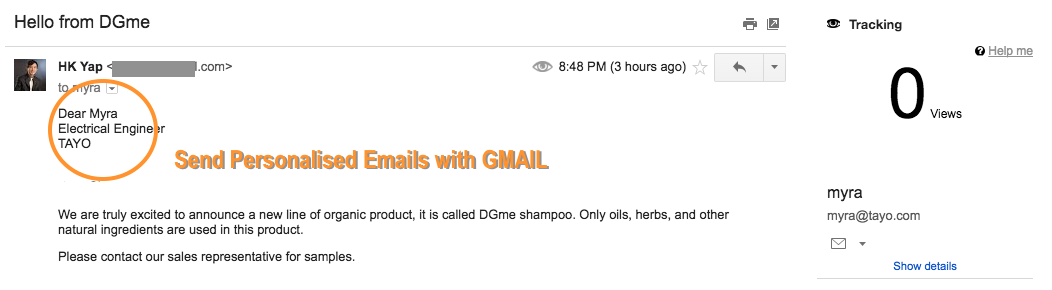
Send personalised emails with Gmail
Companies today still rely on the use of opt-in email marketing campaigns to boost sales.
Most businesses send to thousand email recipients using cc or bcc, however, the effectiveness of such emails is incredibly low. Recipients of your emails on the cc or bcc lists are likely to view your emails as spams. Hence, it is definitely better to sign up for a professional newsletter service. These professional services allow you to send personalised emails with your contacts' details and preferences for increased engagement.
Free Tool to Send Personalised Emails using Gmail
If you are using Gmail, you could consider using Streak to send such personalised emails. Streak is a Google Chrome add-on which transforms your Gmail into a suite of CRM tools.
Streak is based in the cloud and allows businesses to manage sales and customer relationships directly inside Gmail via an Google Chrome addon. Streak lets you manage your sales pipeline inside Gmail. run your entire Sales process right inside your inbox. so you can capture your sales deals and extends existing Gmail into a flexible, fully featured CRM. Mail Merge and View Tracking are two powerful features of Streak.
To start using Streak, visit www.streak.com and install Streak using Google Chrome.
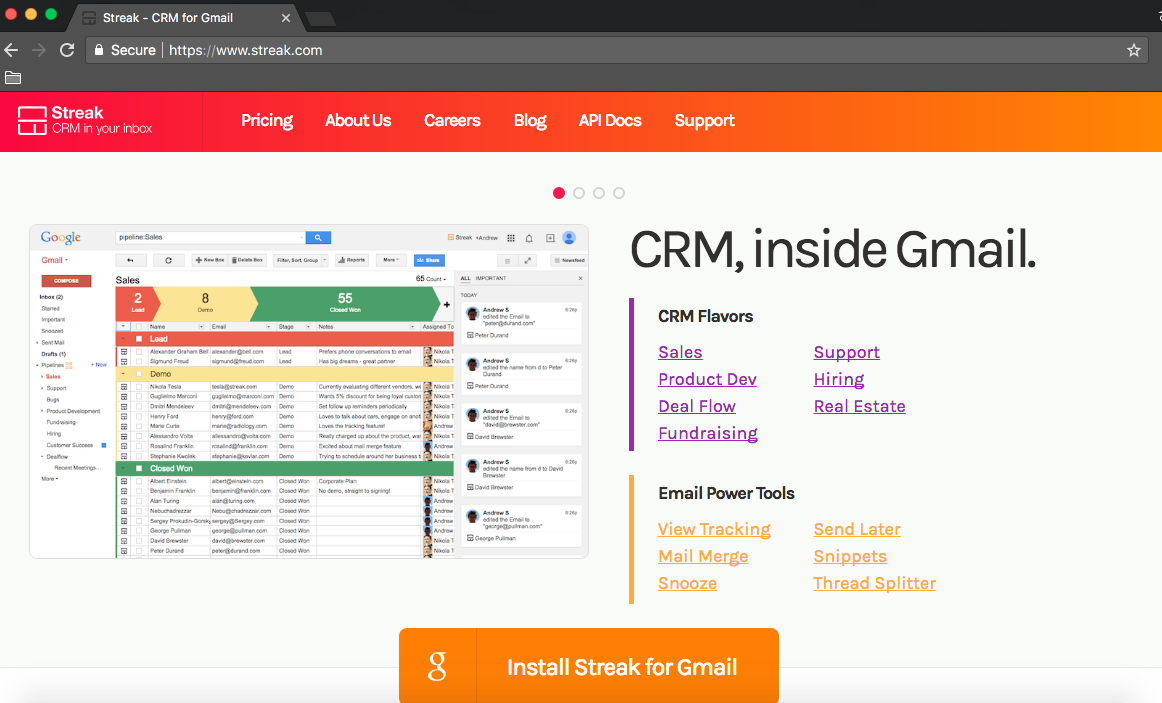
Install Streak for Gmail

Streak installed in Gmail
Once installed, you are ready to go. Click on 'Streak installed. Go to Gmail'
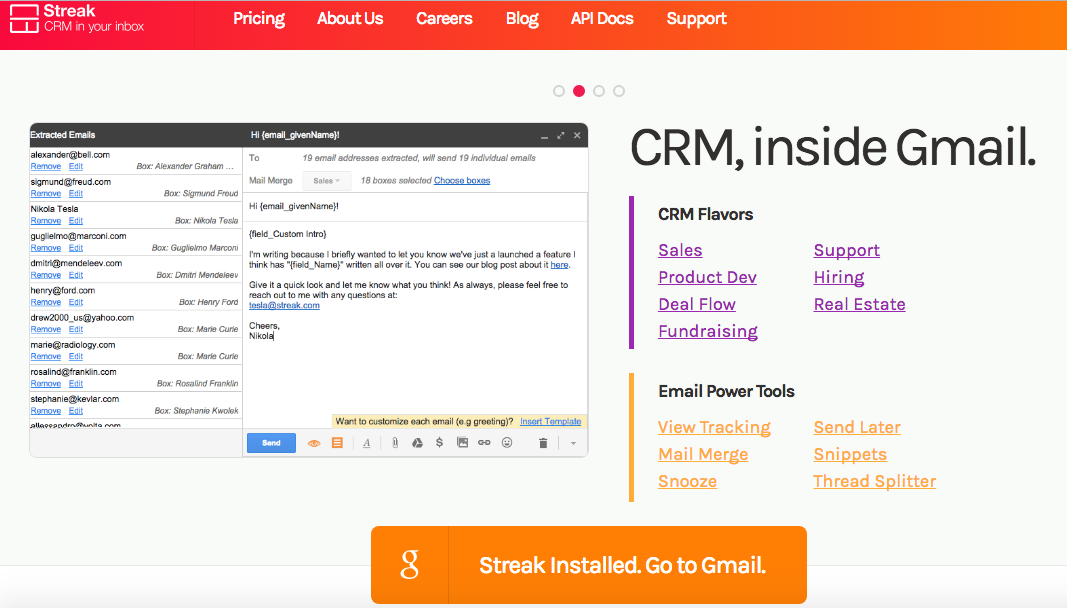
Suppose you keep a record of your contact details in an CSV file as shown below. Let us now go through the steps of importing this list into Gmail installed with Streak.
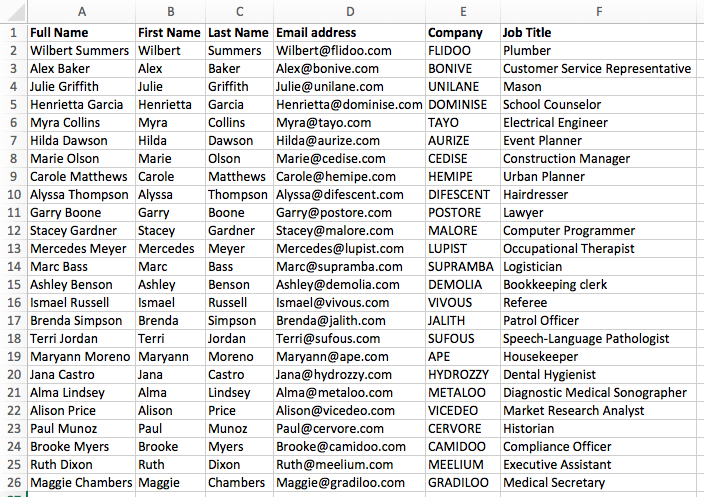
Sample Contact Details
Random names by of http://random-name-generator.info/
Random business names by http://www.businessnamegenerators.com Random job titles by https://www.randomlists.com/random-jobs  Compose in Gmail Compose in Gmail
Click 'Compose' as you would normally do in Gmail to write a new email.
Watch the screen recording below on how Mail Merge can be easily done with Streak for Gmail. 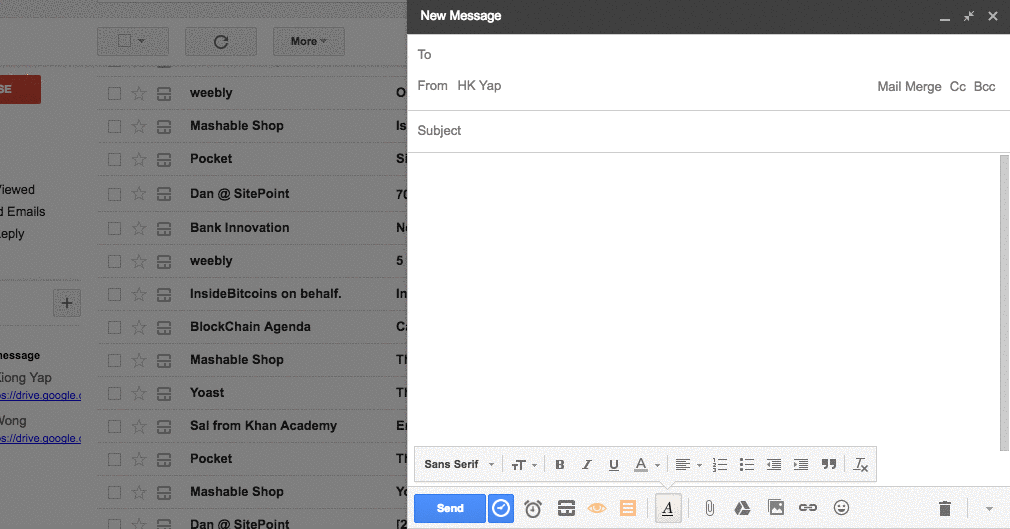
screen record - sending personalised emails using Streak in Gmail
Yes! That's how easy it is to send personalised emails with Streak.
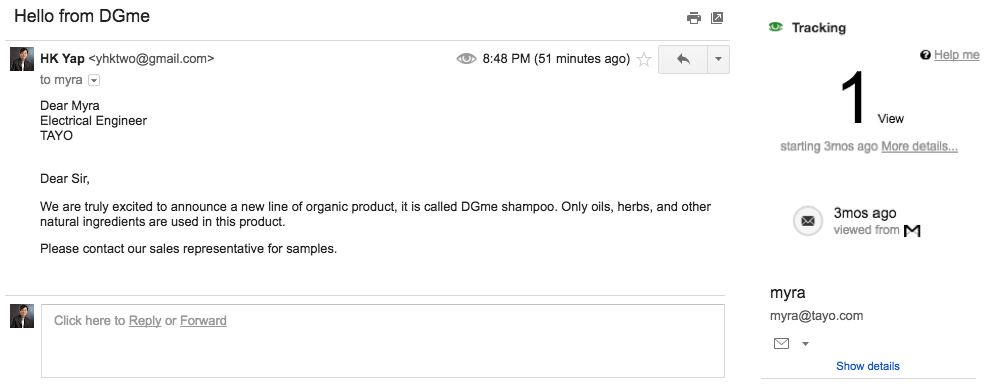
You can even keep track of your emails read status easily within Gmail.
Track Your Website's Performance
Google Search Console
Most of us are aware of using Google Analytics to measure (and analyse) the traffic on your site. However, not all are aware that Google has another free tool known as Google Search Console (previously Google Webmaster) that helps you monitor and maintain your website's presence in Google Search results.
Set up Google Search Console to track your website's performance by clicking on 'Add a property' as shown above. Follow the instructions to add the website URL address you wish to track into the entry box.
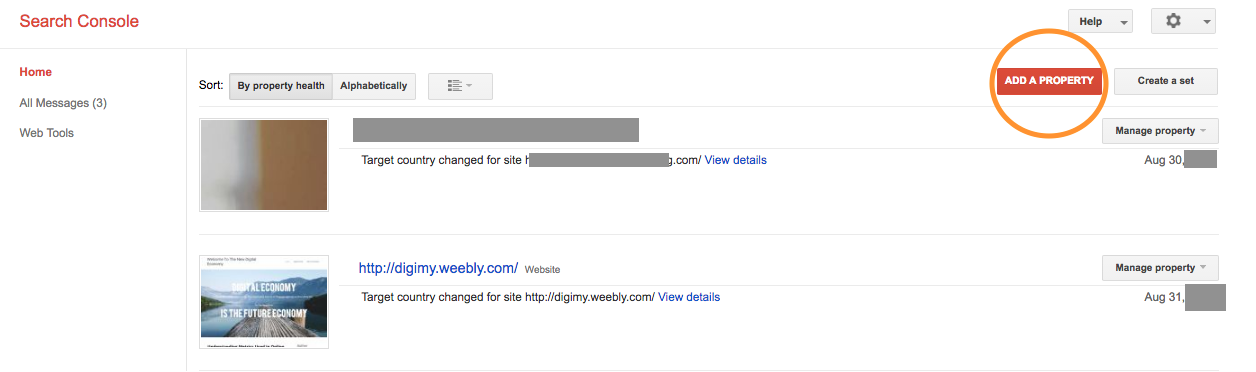
Add a property in Google Search Console
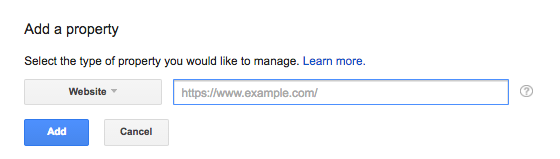
Google Search Console -> Add a property
Once Google has started to index your website's pages, you can check indexing status and optimise visibility of your website using Google Search Console.
Below shows the the email sent from Google Search Console after successful set-up.
Follow the instructions in the email by clicking on the first link. 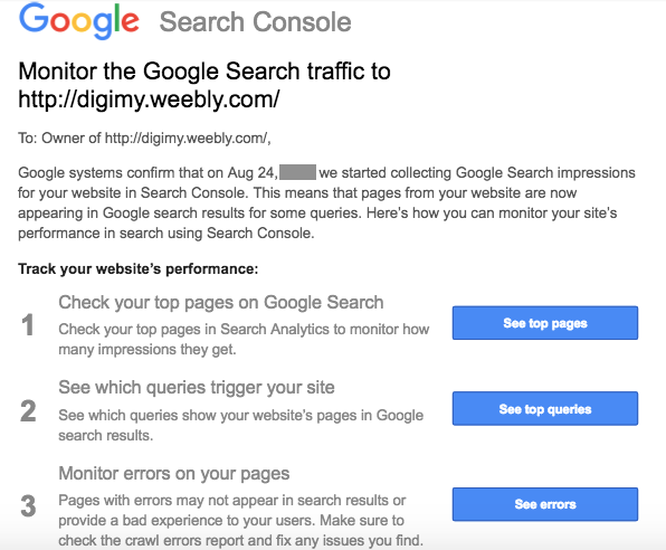
Monitor the Google Search traffic - Google Search Console
1. Search Analysis - Top Pages
Track Your Website's Performance
Click on the first item, which is Search Analysis - Top Pages to view number of clicks, impressions, CTR and Average Position of your site pages
Check ALL tabs under 'Clicks', 'Impressions', 'CTR' and 'Position' to view the performance of your website pages.
For more information regarding Click-Through-Rate (CTR) and other online performance measurement metrics, please visit my other post 'Understanding Metrics Used in Online Advertisement Campaigns Such As Click-Through-Rate, Cost-Per-Click' here
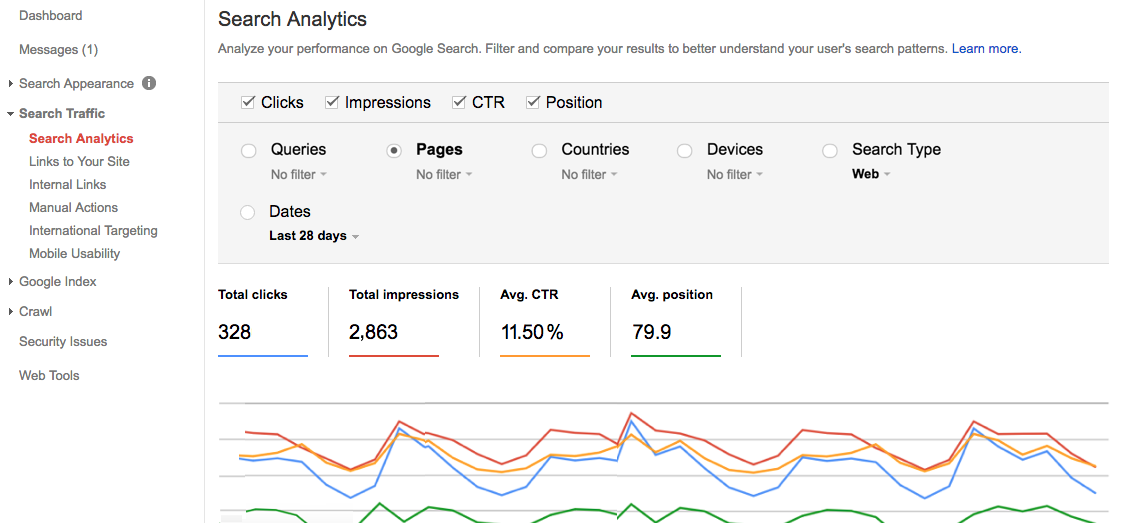
Google Console -> Search Traffic -> Search Analytics filtered by Pages
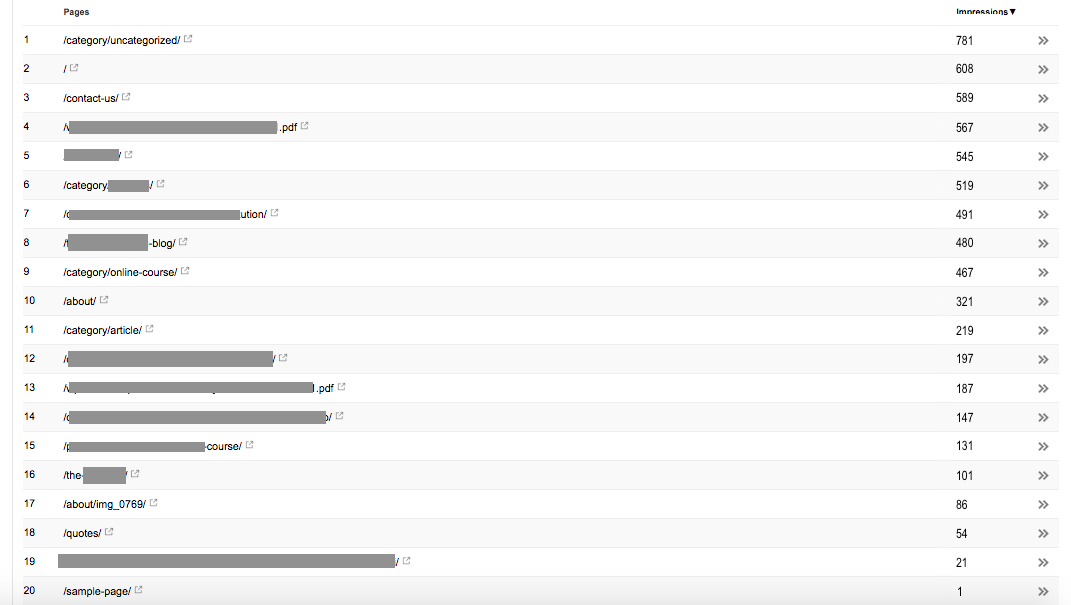
Next, uncheck all except 'Impressions' to view your top performing pages

Google Console -> Search Traffic -> Search Analytics filtered by Impressions and Pages
Google Search Console -> Search Traffic -> Search Analytics Pages by Impressions
Check 'Clicks', 'Impressions' and 'CTR'
Below is a sample results page showing the same Search Analysis filtered by Devices.
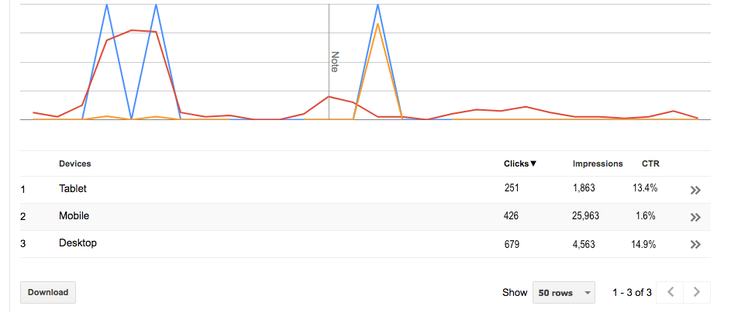
Google Search Console > Search Traffic > Search Analysis Filtered by Devices
2. Which Queries Trigger Your Website
Next, click on the 2nd link in the email from Google Search Console to view results by query strings that users searched for on Google.

See which queries trigger your site
This report allows you to view the query strings that users search for on Google to your website. Obviously, only searches that returned your website will be included.
Are you missing some keywords that you expect to see? These keywords could be missing out from your website content. Which keywords result in high CTR? Which keywords result in high impressions but low CTR? These results help you improve your website content to achieve better outcomes. 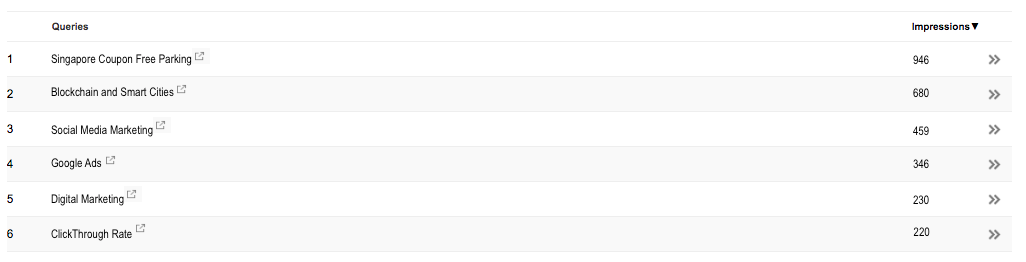
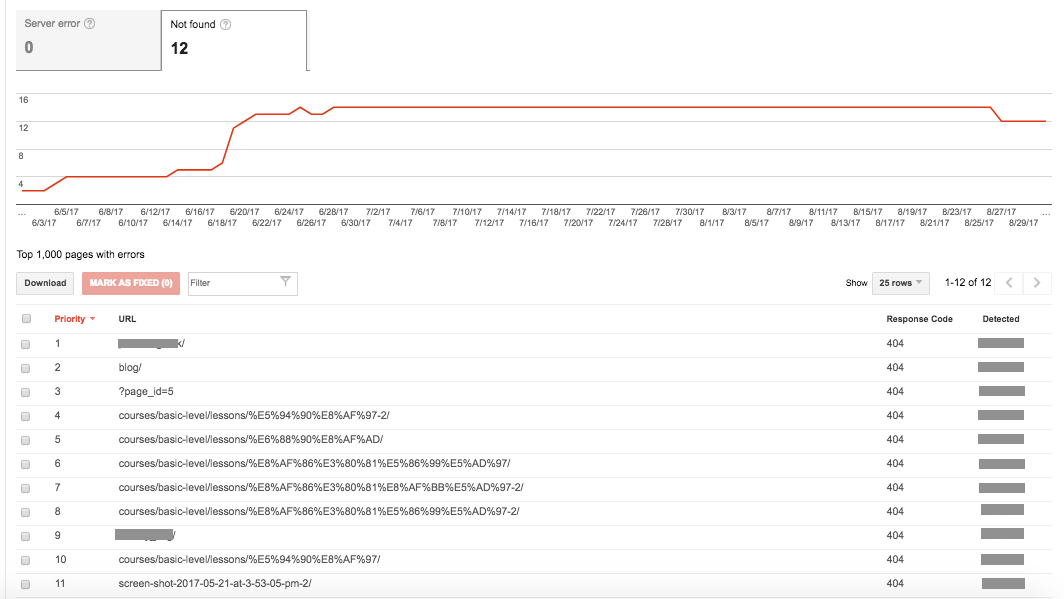
3 Monitor Errors On Your Pages
By default, you will be taken to the 'Crawl Errors' report page. The Crawl Errors report for websites provides details about the site URLs that Google could not successfully crawl.
Two types of errors can be viewed here:
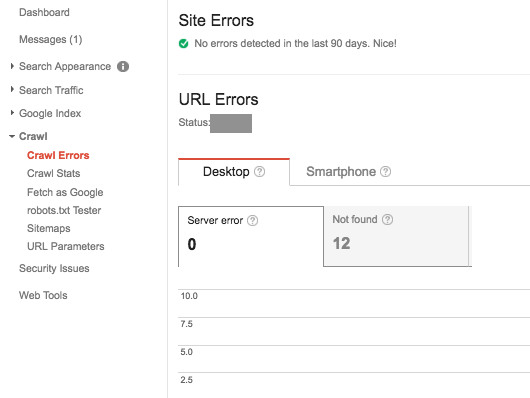
Google Search Console -> Crawl -> Crawl Errors
The most common errors would be 'Not found' (Error 404). Go back to your website editor to fix the 'Not found' errors in the list.
Online Advertising
You have probably come across many metrics used in online advertising like the ones shown below.
Online advertisement is a good way to increase site traffic and hopefully brings about more business. There are many online metrics used by the online advertising industry such as Ad impression, Click-Through-Rate, Cost-Per-Click, and Conversion Rate, etc.
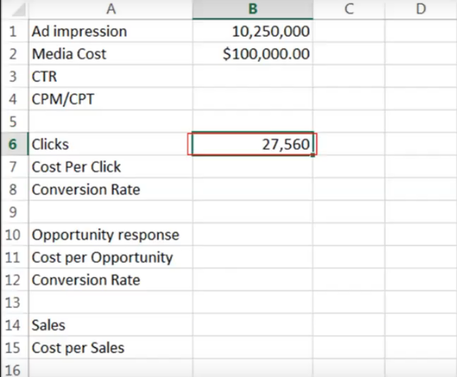
Understanding these online metrics will help you better understand your advertisement dollar effectiveness. What exactly do these metrics mean? This post attempts to explain with the help of a spreadsheet, such as Microsoft Excel. Open your Microsoft Excel and type the following: 
Understanding Online Advertisement Metrics Using Microsoft Excel
Let's say you have spent $100K on a particular online advertising campaign, e.g. Google Adwords. Type $100,000 into cell B2 in your Excel spreadsheet.
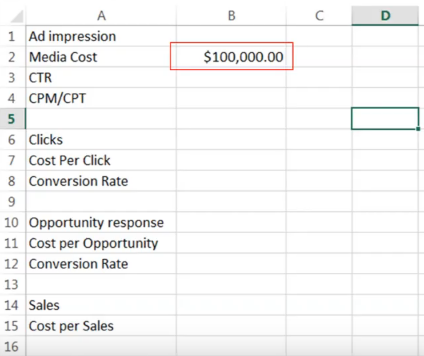
Media Cost
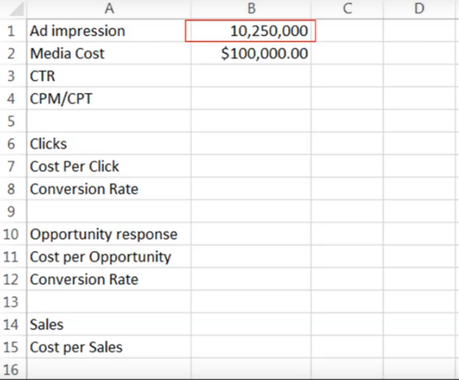
Let us now fill in the Ad Impression B1 cell onto the Excel spreadsheet.
Open up your Google Adwords Control Panel as shown below. Each time your ad appears on Google Search Page Results or on Google Display Network, it is counted as one impression. You cannot have Clicks without Impressions. Users need to see your Ads before they can decide whether to click on them. In this example, you have spent $100,000 to get 10,250,000 ad impressions. 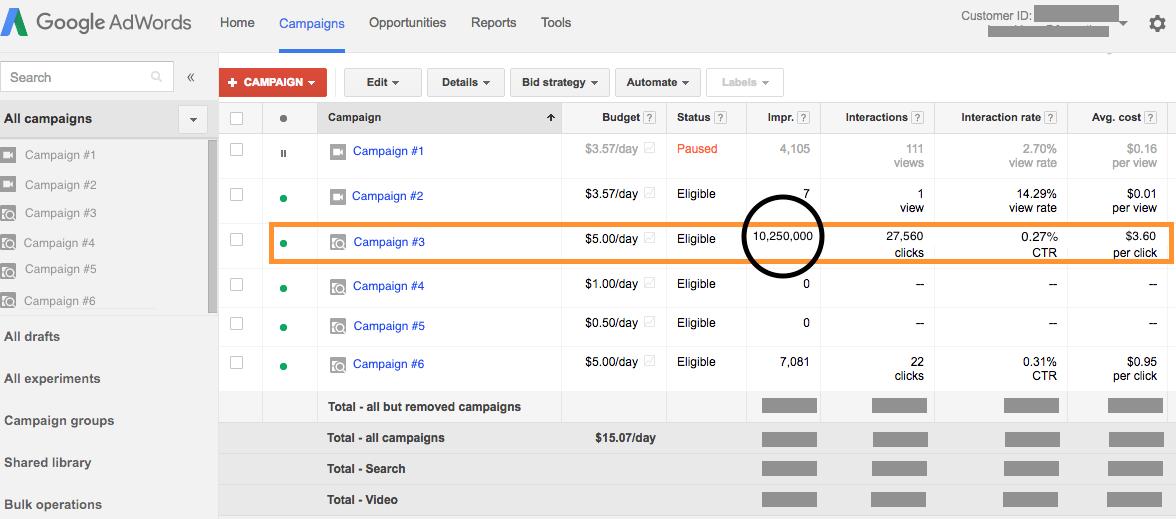
Ad Impressions
Understanding Online Advertising Metrics Using Microsoft Excel
Next, check out the number of interactions under your Google Adwords control panel. An interaction is the main user associated with an Ad format. "Clicks" for Text and Shopping Ads, "Views" for Video Ads, and so on. The interaction column counts different user actions depending on Ad formats, Regardless of formats, this column indicates how well your Ads are meeting your advertising goals.
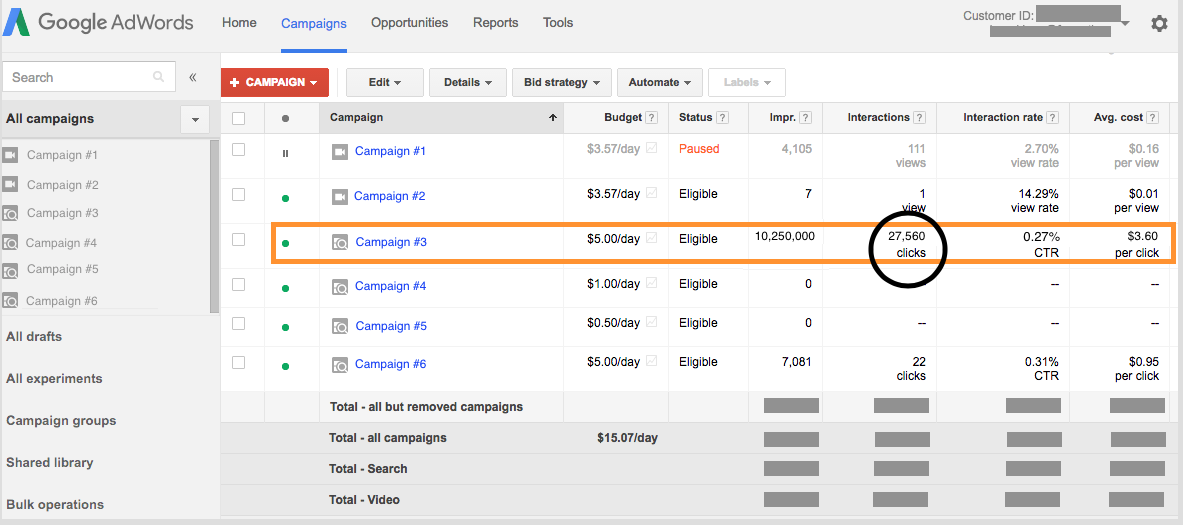
Click Interactions
Fill in 27,560 under Clicks in cell A6 in your Excel Spreadsheet.
Understanding Online Advertising Metrics Using Microsoft Excel
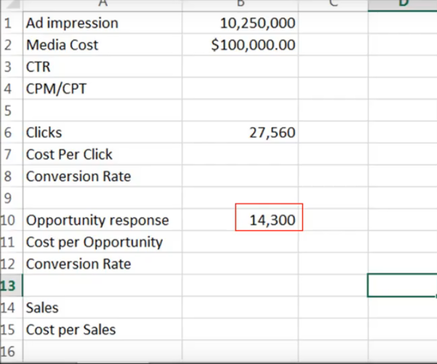
Next, we are going to fill in the Opportunity response which is also known as 'Conversion'. A Conversion happens when someone clicks your ad, and then takes an action which you define as valuable to your business such as subscribing to your company's newsletters.
Conversion Tracking is a free tool in Google Adwords that show you what happens after someone clicks on your ad, whether they purchase your product, sign up for your newsletters, call your business or downloaded your app. When someone completes an action which you define as valuable, these actions are defined as conversions.
For information on how to set up conversion tracking, click below resource.
Retrieve the number of conversions from your Google Adwords Conversion Tracking dashboard as shown below and fill in the number in your Excel Spreadsheet.
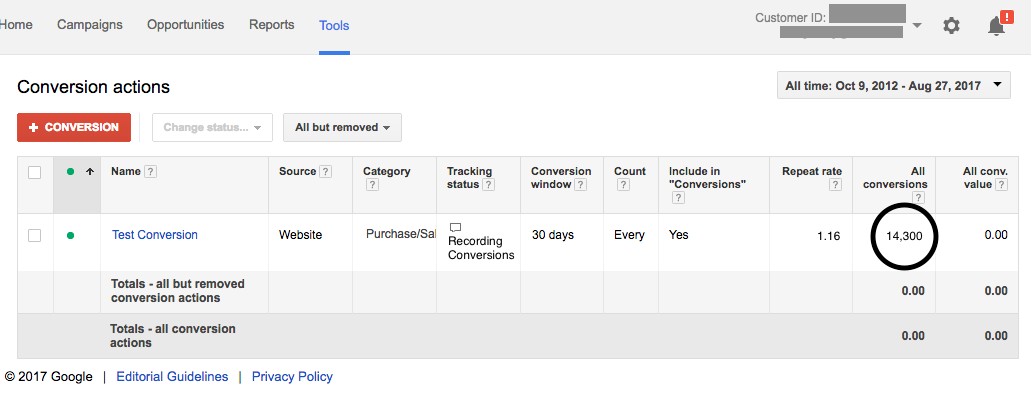
Google Adwords Conversion Tracking Dashboard
Understanding Online Advertising Metrics Using Microsoft Excel
Now that you have entered the four basic information into the Excel Spreadsheet, let us now proceed to work on the rest.
Click-Through-Rate (CTR)
Click-Through-Rate (CTR) is the ratio of users who click on the Advertisement link to the number of Ad Impressions.
Hence, type the formula =B6/B1 into Cell B3. You should get 0.27% for CTR. 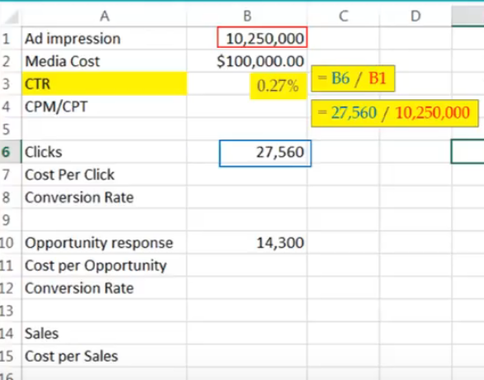
Understanding Online Advertising Metrics Using Microsoft Excel
Cost-Per-Thousand (CPM or CPT)
Cost-Per-Thousand is a marketing term used to denote the price of 1000 advertisement impressions.
Type the formula =B2/B1 * 1000 into Cell B4. You should get $9.76 for CPM. 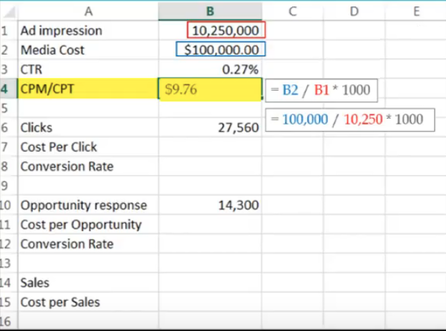
Understanding Online Advertising Metrics Using Microsoft Excel
Cost-Per-Click (CPC)
Cost-Per-Click (CPC) refers to the actual price you pay for each click in your online advertisement.
Type the formula =B2/B6 into Cell B7. You should get $3.63 for CPC. 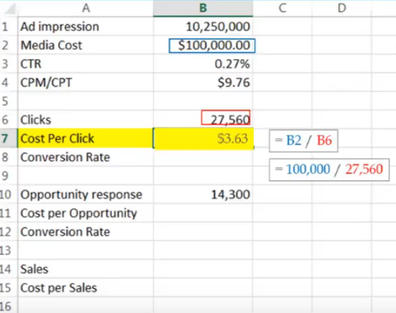
Understanding Online Advertising Metrics Using Microsoft Excel
Conversion Rate (Action)
Conversion Rate is the average number of conversions per Ad click, shown as a percentage. Conversion Rate is computed by simply taking the number of conversions and dividing that by the total number of Ad clicks.
Type the formula =B10/B6 into Cell B8. You should get 51.89% for Conversion Rate. 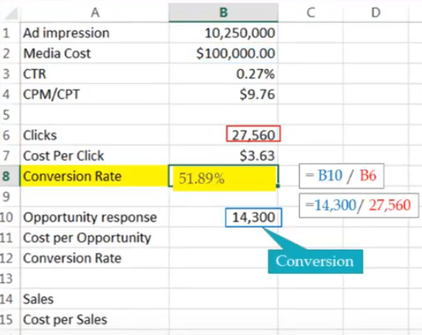
Understanding Online Advertising Metrics Using Microsoft Excel
Cost-Per-Opportunity
To find out the Cost Per Opportunity,
Type the formula =B2/B10 into Cell B11. You should get $6.99 for Cost-Per-Opportunity. 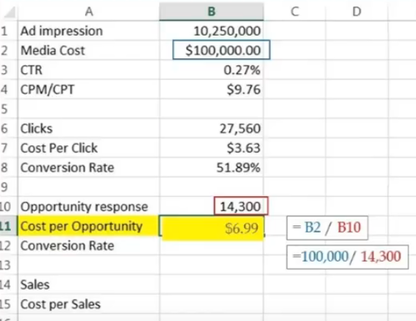
Understanding Online Advertising Metrics Using Microsoft Excel
Conversion Rate (Sales)
Assuming you made a total 1,235 sales after spending $100,000 in online advertisement campaigns, let us now calculate the Conversion Rate for your Sales.
Conversion Rate for Sales is calculated by taking Sales divided by total number of conversions. Type the formula =B14/B10 into Cell B12. You should get 8.64% for Conversion Rate. 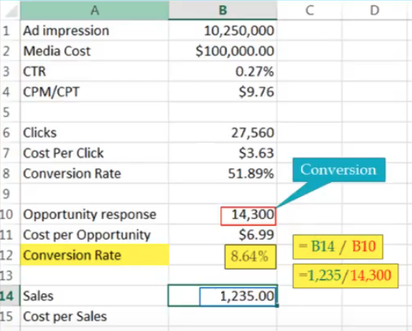
Understanding Online Advertising Metrics Using Microsoft Excel
Cost-Per-Sales
To find out Cost-Per-Sales, simply
Type the formula =B2/B14 into Cell B15. You should get $80.97 for CPS. 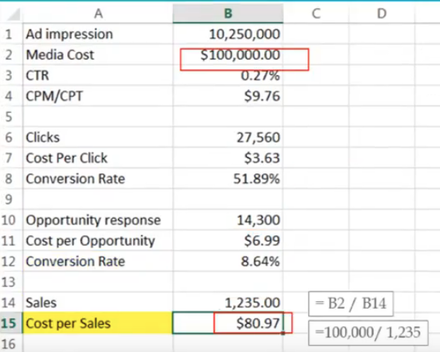
Understanding Online Advertising Metrics Using Microsoft Excel
To watch a video about this post, please click below
Summary
Let us summarise the following key metrics with the help of a Sales Funnel diagram as shown below.

Sales Funnel
How Google Adwords Work?
In Google Adwords, you control the amount you pay for every click to your site by setting the keywords' max. Cost-per-click (CPC) bid price. In this sense, Google AdWords gives you full control over your advertising costs.
When someone enters a search term in Google, E.g. Calculating Cost Per Click in Google Adwords, Google AdWords runs an auction to determine the ads and their ranks that show on the search results page (SERP). See illustration below. Ad position is the order in which your ad shows up on a page. Having an Ad position of 1 means that your ad is the first ad on a page. 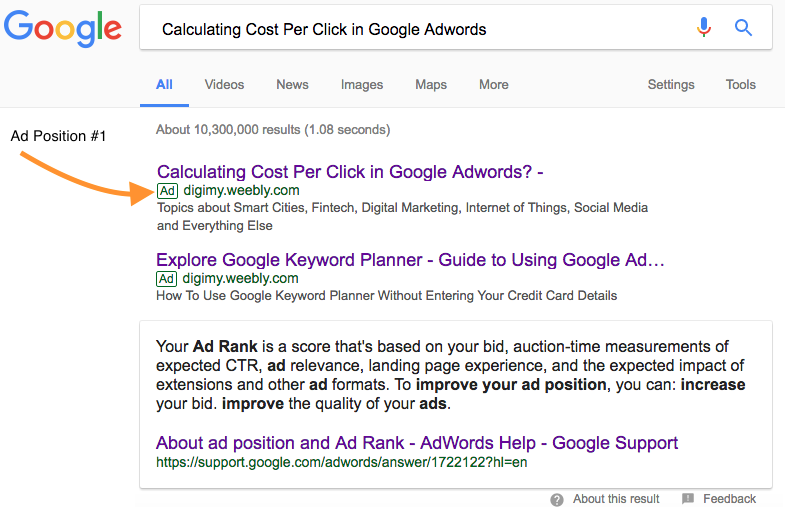
Improving my Ad Rank in Google Adwords
In order to achieve a high ad position means that your ad must have a high ad rank. Having a high ad rank allows your ad to perform better in the auction. Does being at the highest position means paying the highest CPC? The answer is NOT NECESSARY.
Three Bidding Strategies in Google Adwords
To be included in this auction, you first have to choose a bidding stratgey. Depending on your goal, there are three bidding strategies to choose from.
Most beginners usually start with using Cost-per-click bidding. This means that you pay for each click on your ads that Google drives to your website.
To use CPC bidding strategy for your campaigns, you set a maximum cost-per-click bid or "max. CPC" - this will be the maximum amount that you are willing to pay for a click to your site. (unless you manually set bid adjustments, or activate Enhanced CPC). For example, you have set a maximum CPC bid of $1 for your ads. The most you'll pay when a someone clicks on your ad is $1. 
How Much Do I Really Pay for My Clicks
Max. Cost Per Click is not the bid price you pay. This is the maximum price you are willing to pay for a click.
To understand, first we must look at how Ad rank works as the actual bid price you pay is dependant on Ad ranks. More specifically, it is dependant on the Ad rank of the second advertiser just below you in rank position. More about this in the later part. How Ad rank works
Businesses and site owners strive to have their ads appear higher on a page because it's likely that more people will see the ad.
In the Youtube video dated Jan 25, 2017 below, Hal Varian, Google's chief economist, explains how the AdWords auction works. The main factors affecting your Ad Rank are your bids and the quality of your ads and website. According to Google, the expected impact from your extensions and other ad formats also are taken into account when computing your Ad Rank Hence, Ad rank = max. CPC bids X Quality Score X Ad Format
Based on the examples given in the video, here's how the table will look like when comparing with other advertisers competing for the same keyword.
In the example above, Advertiser A will be placed at the top of the advertisements since it scored highest in terms of Ad Rank. Google has another way to work out the actual Cost-per-click which is different from the max. CPC. This means, the price paid by Advertiser A is not S$2 which was bidded. In fact, every advertisers only pay slightly above the immediate advertiser below them. In other words, the Cost-per-Click is a number calculated just enough to still maintain a rank higher than the one below their ranks. To put it bluntly, had Advertiser A put in a bid of $1.73, it would result in his Ad Rank being 16 (or 15.01??) with the same Quality Score and Ad Format values. Hence $1.73 is the Cost-Per-Click paid by Advertiser A since the Ad Rank of 16 is enough to outdo Advertiser B's Ad rank of 15.
Let's assume the formula to calculate CPC is
CPC = Ad Rank of the Advertiser just below you / Your Quality + 0.01 Again using the examples given in the video, I have added a column known as 'Quality' as a score determined by both the Quality Score and Ad Format. Example, CPC of Advertiser A = 15 / 8.72 + 0.01 = $1.73
The Cost-Per-Click for Advertiser A is $1.73.
You notice that Advertiser A, being the first in the ad position, is not paying the highest Cost-per-click CPC. In fact, Advertise B pays higher. Advertiser C paid the lowest among all because Advertiser D has the lowest Ad rank and hence paid the highest CPC. We do not know exactly if the above formula is the correct one used by Google. We also do not know the formula to derive at Ad ranks. However, I hope that the simple illustration gives you a better idea of how Google Adwords work. Below are more resources related to Ad rank and Quality Score. Ad Rank and Average Position
Having an Ad rank position of "1" means that your ad is the first ad on a page. Ad rank isn't a metric that you can see anywhere in your account However, it determines the ad position you win in the auction. You can roughly gauge the performance of your ad by looking at another Google Adwords attribute known as Average Position. An average position of 1-8 is usually on the first page. 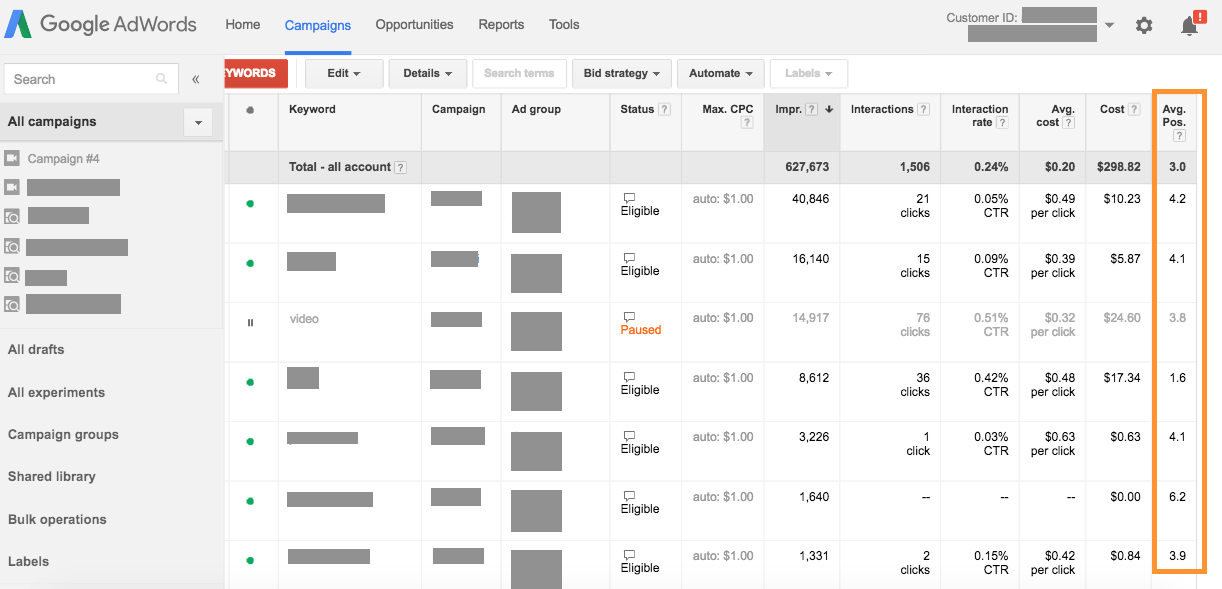 Checking your Average Position on Google Adwords Checking your Average Position on Google Adwords
What Determines Quality Score
By just looking at the table above in determining Ad Rank and Cost-Per-Click, it seems that to improve your ad position, you can either
How Google derive its Quality Score depend on various factors at auction time. Some of the important ones are listed below-
Nobody knows exactly the algorithm being used by Google in deriving at Quality Scores and hence Ad Positions. However, when more people who see your ad click on it, that is a strong signal to Google that your ads are relevant to the person searching. Therefore, Click-Through Rate is one important factor to be considered. Next, Google recently announced the inclusion of ad formats into its calculation of Quality Score. Ad extensions are common types of ad formats. These may include locations and business addresses, site links. On Quality of Landing page, according to Google, a quality landing page
https://support.google.com/adwords/answer/1722122
Experimenting Google Adwords
Google Adwords - You can experiment with the keyword tools and learn more about Google Campaigns without having to run the actual ads.
However, you will be asked to enter your credit card details when you first sign up for a Google Adwords account. What if you just wanted to explore the keyword planner and are not ready to give your credit details yet? View the following on how to Open an AdWords Account without a Credit Card. When you first create a Google Adwords account, you will be prompted to enter some information such as email, country and time zone. 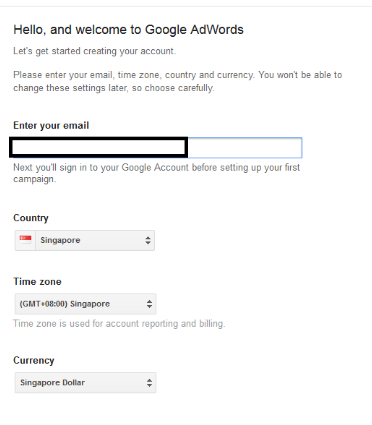
Creating a Google Adwords account
Important Step to Bypass the Credit Card Information Page
Next, when you see the following page, DO NOT enter the rest of the details. Click on 'Skip the guided setting' immediately to bypass having to enter your credit card details.
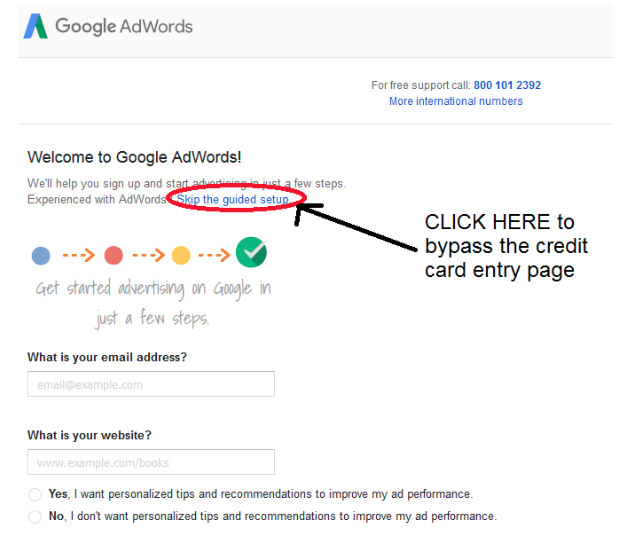
Skip the guided setup to bypass Credit Card details
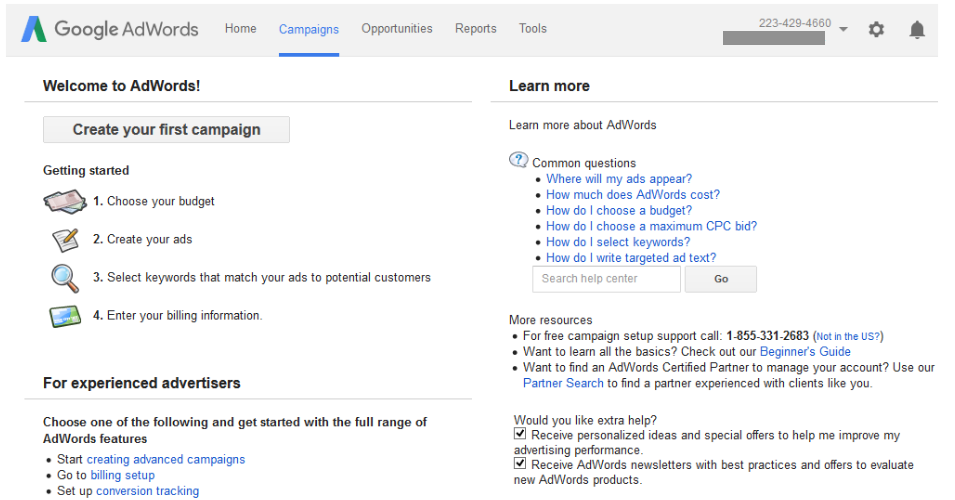
You will see the following page available for you to explore the keyword planner within Google Adwords without having to enter your credit card details.
Creating your first Google Adwords campaign
|

 RSS Feed
